

Forex trading strategies for using the Harmonic Bullish Three Drives 5-0 pattern: Approaches for trading with the Harmonic Bullish Three Drives 5-0 pattern.
In the dynamic world of forex trading, a multitude of strategies and patterns are employed to predict market movements and generate profits. One such powerful tool is the Harmonic Bullish Three Drives 5-0 pattern. This pattern, rooted in the principles of harmonic trading, offers traders a unique opportunity to identify potential trend reversals and capitalize on market fluctuations. In this article, we will delve into the intricacies of the Harmonic Bullish Three Drives 5-0 pattern and explore effective approaches for trading with this pattern.
Table Content
I. Understanding the Harmonic Bullish Three Drives 5-0 Pattern
II. Approaches for Trading with the Harmonic Bullish Three Drives 5-0 Pattern
1. Pattern Recognition and Confirmation
2. Entry Points and Stop Loss
3. Target Profits and Exit Strategies
4. Combining with Other Indicators
5. Practice and Risk Management
III. Footnote
Understanding the Harmonic Bullish Three Drives 5-0 Pattern
Harmonic trading is a methodology that aims to predict future price movements based on specific price patterns and Fibonacci ratios. Among the various harmonic patterns, the Bullish Three Drives 5-0 pattern stands out for its ability to indicate potential bullish reversals. This pattern consists of five distinct legs and incorporates both Fibonacci retracement and extension levels.
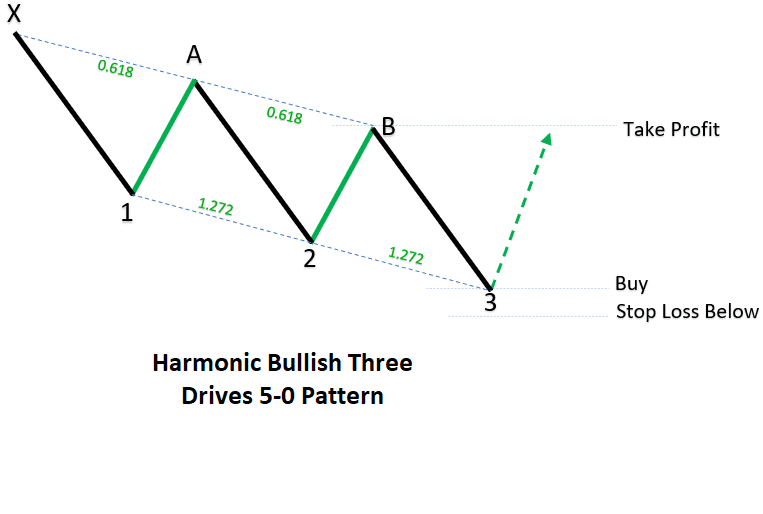
- Drive 1 to Drive 2: This is the initial leg of the pattern, where the price experiences a bullish move. This leg is followed by a retracement (usually around 0.618 of the Drive 1 to Drive 2 leg), marked as Point B.
- Drive 2 to Drive 3: The price then continues its upward movement, forming the second leg of the pattern. After reaching its peak, the price retraces again, typically to the 0.618 level of the Drive 2 to Drive 3 leg, which is identified as Point C.
- Drive 3 to Drive 4: The third leg is characterized by another bullish push. This leg typically extends beyond the peak of Drive 2, demonstrating the market's strength. The retracement that follows usually ends near the 0.786 level of the Drive 3 to Drive 4 leg, termed Point D.
- Drive 4 to Drive 5: The fourth leg is yet another bullish movement that surpasses the peak of Drive 3. This confirms the upward momentum and potential reversal. Following this, a retracement occurs, usually ending around the 0.382 level of the Drive 4 to Drive 5 leg, identified as Point E.
- Drive 5 to Completion: The fifth and final leg is marked by a substantial bullish push, demonstrating the strength of the trend reversal. This drive often ends near the 1.618 Fibonacci extension of the Drive 4 to Drive 5 leg, signaling the completion of the pattern.
Approaches for Trading with the Harmonic Bullish Three Drives 5-0 Pattern
Trading with the Harmonic Bullish Three Drives 5-0 pattern involves careful analysis and strategic execution. Here are some approaches to consider:
1. Pattern Recognition and Confirmation:
The first step is identifying the pattern on your price chart. The distinct five-leg structure makes it relatively easy to spot. Once recognized, it's essential to confirm the pattern's validity. Look for adherence to Fibonacci retracement and extension levels. A close match to these ratios enhances the pattern's reliability.
2. Entry Points and Stop Loss:
Entry points are crucial for maximizing potential gains. Traders often enter a trade when the price completes the Point E retracement and shows signs of resuming its bullish trajectory. However, it's wise to wait for additional confirmation, such as candlestick patterns or other technical indicators, before entering.
To manage risk, placing a stop-loss order slightly below Point E or the completion of Drive 4 to Drive 5 can protect against unexpected reversals. This ensures that losses are minimized if the trade does not unfold as anticipated.
3. Target Profits and Exit Strategies:
Determining target profit levels is essential for effective risk-to-reward management. One common approach is setting the target near the 1.618 Fibonacci extension of the Drive 4 to Drive 5 leg. However, some traders opt for a more conservative approach by setting targets at earlier Fibonacci extension levels or significant resistance points.
Exiting the trade should also be guided by technical indicators and price action. Traders often look for signs of potential reversal or weakening momentum as signals to exit.
4. Combining with Other Indicators:
While the Harmonic Bullish Three Drives 5-0 pattern is powerful on its own, combining it with other technical indicators can enhance its effectiveness. Indicators like moving averages, Relative Strength Index (RSI), and MACD can provide supplementary insights into the market's trend and momentum, corroborating the pattern's predictions.
5. Practice and Risk Management:
As with any trading strategy, practice is key to mastering the Harmonic Bullish Three Drives 5-0 pattern. Utilizing a demo account or trading in a controlled environment can help refine your understanding of the pattern and its nuances.
Effective risk management is fundamental. Never risk more than a predetermined percentage of your trading capital on a single trade. Additionally, diversifying your portfolio and not relying solely on this pattern can help mitigate potential losses.
Footnote
The Harmonic Bullish Three Drives 5-0 pattern is a potent tool in a forex trader's arsenal, providing a structured approach to identifying potential bullish reversals. By understanding the pattern's components, confirming its validity, and integrating it with other technical indicators, traders can make informed decisions and enhance their trading success. However, it's essential to remember that no strategy guarantees profits in the ever-changing forex market. Diligent practice, continuous learning, and disciplined risk management remain crucial aspects of any successful trading journey.


Discussion