
Forex Trading Strategies for Using the Harmonic Bullish Shark 5-0 Pattern: Approaches for Trading with the Harmonic Bullish Shark 5-0 Pattern
In the world of forex trading, traders are always on the lookout for reliable and effective strategies to gain an edge in the complex and dynamic market. The Harmonic Bullish Shark 5-0 pattern is one such tool that has gained attention among technical traders. This pattern is a fusion of two well-known harmonic patterns - the Bullish Shark and the Bullish 5-0 pattern. Mastering the art of utilizing the Harmonic Bullish Shark 5-0 pattern can provide traders with valuable insights into potential price movements and enhance their trading decisions. In this article, we will delve into the intricacies of this pattern and explore various approaches to effectively trade with it.
Table Content
I. Understanding the Harmonic Bullish Shark 5-0 Pattern
II. Approaches for Trading with the Harmonic Bullish Shark 5-0 Pattern
1. Pattern Recognition and Confirmation
2. Confluence of Technical Factors
3. Entry and Stop-Loss Placement
4. Target Profits and Risk-Reward Ratio
5. Multiple Timeframe Analysis
6. Back testing and Practice
7. Risk Management and Psychology
III. Footnote
Understanding the Harmonic Bullish Shark 5-0 Pattern
The Harmonic Bullish Shark 5-0 pattern is a powerful technical setup that combines elements of Fibonacci retracements and extensions to identify potential trend reversals. This pattern is characterized by its unique geometry, involving specific price ratios and distinct price points. It consists of five primary points: X, A, B, C, and D. These points help define the structure of the pattern and provide traders with entry and exit levels.
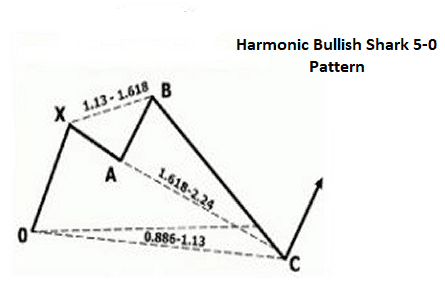
- Point X: This is the starting point of the pattern and represents the initial leg of the reversal. It is usually the lowest point of the price movement.
- Point A: Point A is the first retracement from the X point. It signifies the end of the initial leg and the beginning of the retracement.
- Point B: Point B is an extension of the retracement from Point A. It is often the 88.6% retracement of the XA leg. The BC leg represents the reversal in progress.
- Point C: Point C is a crucial level as it signifies the turning point of the retracement. It is typically the 38.2% retracement of the XA leg.
- Point D: Point D is the completion of the pattern and serves as the entry point for traders. It marks the 88.6% retracement of the XA leg and is often followed by a strong bullish move.
Approaches for Trading with the Harmonic Bullish Shark 5-0 Pattern
Trading with the Harmonic Bullish Shark 5-0 pattern requires a keen understanding of market dynamics, patience, and disciplined execution. Here are several approaches traders can consider when incorporating this pattern into their trading strategy:
1. Pattern Recognition and Confirmation
The first step in trading the Harmonic Bullish Shark 5-0 pattern is recognizing it on the price chart. This involves identifying the XABC legs and confirming their alignment with Fibonacci retracement levels. Various trading platforms offer pattern recognition tools that can help traders pinpoint these setups accurately.
2. Confluence of Technical Factors
To increase the probability of a successful trade, traders should look for confluence with other technical factors. These factors could include support and resistance levels, trendlines, moving averages, or other chart patterns. When the Harmonic Bullish Shark 5-0 pattern aligns with these factors, it adds more weight to the potential trade setup.
3. Entry and Stop-Loss Placement
For entering a trade, traders typically execute a long position at Point D, which is the 88.6% retracement of the XA leg. Stop-loss orders are commonly placed below Point X or Point C, ensuring a buffer to accommodate potential price fluctuations. This strategic placement helps manage risk effectively.
4. Target Profits and Risk-Reward Ratio
Determining target profits is crucial for maintaining a favorable risk-reward ratio. Traders can identify potential exit points by using Fibonacci extensions. Common extension levels include 38.2%, 50%, and 61.8% of the CD leg. Striking a balance between achievable profits and risk is essential for consistent trading success.
5. Multiple Timeframe Analysis
Incorporating multiple timeframe analysis can provide a broader perspective on the pattern's validity. Traders can identify the pattern on higher timeframes for overall trend analysis and then switch to lower timeframes for precise entry timing. This approach helps to avoid false signals and provides a more comprehensive view of market conditions.
6. Back testing and Practice
As with any trading strategy, practice and back testing are crucial. Traders should test the Harmonic Bullish Shark 5-0 pattern on historical data to gauge its effectiveness. Back testing helps refine entry and exit strategies and also assists traders in understanding the pattern's performance under various market conditions.
7. Risk Management and Psychology
Trading the Harmonic Bullish Shark 5-0 pattern, like any trading strategy, involves managing emotions and practicing sound risk management. Traders should avoid overleveraging, stick to predetermined stop-loss levels, and refrain from chasing trades. Maintaining a disciplined mindset is essential to navigate the challenges of forex trading.
Footnote
The Harmonic Bullish Shark 5-0 pattern presents traders with a unique opportunity to identify potential trend reversals and capitalize on favorable market movements. By understanding the structure of the pattern and applying various trading approaches, traders can enhance their decision-making process and potentially achieve consistent profitability. However, it's important to note that no trading strategy is foolproof, and market conditions can change rapidly. Therefore, traders should combine the Harmonic Bullish Shark 5-0 pattern with other technical and fundamental analyses for a well-rounded trading strategy. As with any trading endeavor, continuous learning, practice, and adaptability are the keys to success in the dynamic world of forex trading.


Discussion