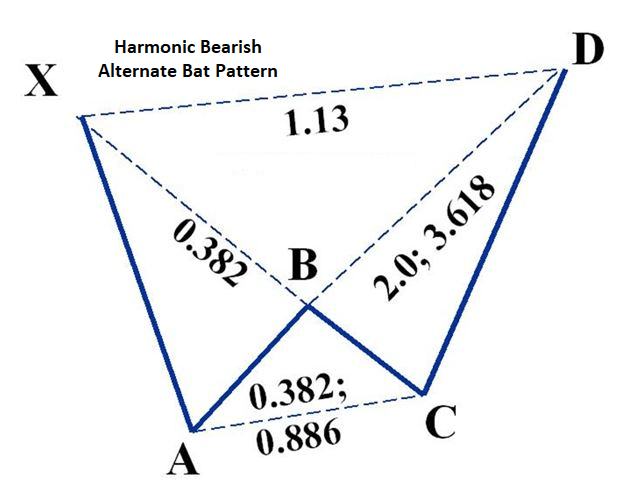
Forex trading strategies for using the Harmonic Bearish Alternate Bat pattern: Approaches for trading with the Harmonic Bearish Alternate Bat pattern.
In the ever-evolving landscape of the foreign exchange (forex) market, traders are constantly on the lookout for reliable and effective trading strategies that can help them navigate the complexities and uncertainties of currency trading. One such strategy that has gained popularity among experienced traders is the Harmonic Bearish Alternate Bat pattern. This intricate pattern offers traders a unique opportunity to identify potential reversals and capitalize on price movements. In this article, we delve into the approaches for trading with the Harmonic Bearish Alternate Bat pattern and shed light on effective forex trading strategies.
Table Content
I. Understanding the Harmonic Bearish Alternate Bat Pattern
II. Trading Strategies with the Harmonic Bearish Alternate Bat Pattern
1. Pattern Identification and Confirmation
2. Wait for Confluence
3. Entry and Stop-Loss Placement
4. Target Profits with Fibonacci Extensions
5. Monitoring and Adjustment
6. Risk Management and Position Sizing
III. Footnote
Understanding the Harmonic Bearish Alternate Bat Pattern
Before delving into the trading strategies, it's imperative to grasp the fundamentals of the Harmonic Bearish Alternate Bat pattern. This pattern is a variation of the broader Harmonic Bat pattern, which is characterized by its distinct price structures and Fibonacci ratios. The Bearish Alternate Bat pattern is considered a reversal pattern, signaling potential trend changes from bullish to bearish. It consists of five key pivot points: X, A, B, C, and D.

The key components of the Harmonic Bearish Alternate Bat pattern include:
co
- X to A Leg: This is the initial leg of the pattern where the price moves from point X to point A. This leg typically represents the first impulse of a potential reversal.
- A to B Leg: The A to B leg is a corrective move that retraces a portion of the X to A leg. This leg often conforms to specific Fibonacci retracement levels, notably the 0.382 or 0.50 levels.
- B to C Leg: The B to C leg is a sharp and impulsive move that ideally extends beyond the X to A leg. This leg usually covers a distance of 1.618 to 2.618 Fibonacci extensions of the X to A leg.
- C Point: The C point is where the B to C leg terminates. It typically coincides with the 0.886 retracement of the X to A leg. This point is crucial as it helps confirm the pattern's validity.
- C to D Leg: The final leg, known as C to D, represents the corrective move from point C to point D. This leg often adheres to specific Fibonacci retracement levels, such as the 0.382 or 0.886 levels.
- D Point: The D point is the potential reversal zone. It aligns with the 0.886 retracement of the X to A leg and also coincides with the 1.618 Fibonacci extension of the A to B leg. A bearish reversal is expected to occur around this point.
Trading Strategies with the Harmonic Bearish Alternate Bat Pattern
1. Pattern Identification and Confirmation
The first step in trading the Harmonic Bearish Alternate Bat pattern is to accurately identify the pattern on the price chart. Traders need to draw the pattern's key pivot points (X, A, B, C, and D) and validate the adherence to Fibonacci ratios. Confirmation can be sought through the use of technical indicators like RSI (Relative Strength Index) or MACD (Moving Average Convergence Divergence) to gauge potential overbought conditions.
2. Wait for Confluence
Successful trading often involves the convergence of multiple factors. When trading the Harmonic Bearish Alternate Bat pattern, traders should wait for confluence with other technical indicators or price patterns. This can include trendline resistance, horizontal support and resistance levels, or candlestick patterns that signal bearish sentiment.
3. Entry and Stop-Loss Placement
Entering the trade at the D point involves careful consideration of risk management. Traders can enter short positions at or near the D point, as this marks the potential reversal zone. To manage risk, a stop-loss order should be placed above the recent swing high, reducing potential losses if the market moves against the anticipated reversal.
4. Target Profits with Fibonacci Extensions
Profit targets can be determined using Fibonacci extensions. These extensions are projected from the X to A leg, helping traders identify potential areas of support where price could reverse. Common extension levels include 0.382, 0.618, and 0.786, as these often coincide with significant levels of market interest.
5. Monitoring and Adjustment
As with any trading strategy, continuous monitoring of the trade is crucial. Price action may not always unfold exactly as anticipated, so traders should be prepared to adjust their stop-loss and take-profit levels if the market provides new signals. This flexibility is key to adapting to changing market conditions.
6. Risk Management and Position Sizing
Effective risk management is the backbone of any successful trading strategy. Traders should never risk more than a predetermined percentage of their trading capital on a single trade. Position sizing should align with the trader's risk tolerance and the specific characteristics of the trade setup.
Footnote
Mastering the Harmonic Bearish Alternate Bat pattern requires a combination of technical expertise, disciplined execution, and the ability to adapt to changing market dynamics. While this pattern holds the potential for lucrative trades, it's essential to remember that no trading strategy guarantees success in every trade. Proper risk management, thorough analysis, and a comprehensive understanding of the pattern's nuances are critical components of successful trading.
As the forex market continues to present diverse opportunities, traders armed with the knowledge and skills to effectively trade the Harmonic Bearish Alternate Bat pattern can position themselves to capitalize on potential trend reversals and achieve their trading objectives. Remember, practice, patience, and continuous learning are the keys to refining your trading strategies and achieving consistent results in the dynamic world of forex trading.


Discussion